
Let’s talk mapping! It can be tricky when you first start lashing to get them even and symmetrical. But don’t worry; this is a normal thing to struggle with. Lash extensions are a popular trend that can give your eyes a natural or dramatic look. However, achieving a flawless set of extensions requires more than just applying the lashes. One of the most important steps in the lashing process is mapping. In this blog post, we will look into the key elements of mapping lash extensions and provide tips for achieving a flawless final result.
Steps of Mapping:
The first step is to conduct a thorough consultation with your client. During this consultation, discussing the client’s desired look and assessing the natural lashes, such as sparse, uneven growth patterns and eye shape, is essential. This information will help you determine the client’s best lash type, shape, and size.
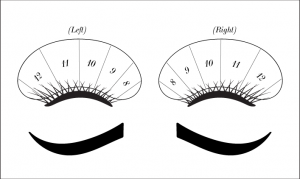
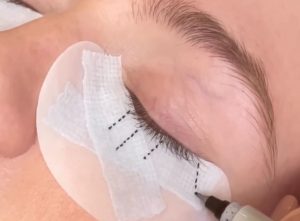
Once the consultation is complete, it’s time to begin mapping. It’s important to ensure that the client’s eyes are closed, relaxed, and comfortable. Next, use a fine-tip pen to mark the under-eye patch. Start by finding the center (pupil line). You will need your client to open their eyes to see this once you draw a dotted line on the under-eye patch. Have your client close their eyes and mark the inner and outer corners. This should be where the lashes start and stop. Once the main points are drawn on, fill in with the other lines you’ll need to create the desired shape. This line serves as a guide for placing the extensions, ensures that the extensions are applied symmetrically, and will give your client the correct shape.
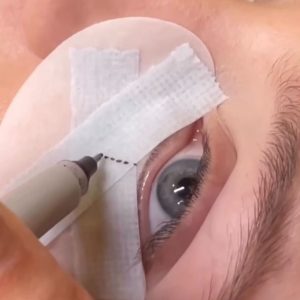
- Mark the center (pupil line)
2.
2. Mark the inner and outer corners.
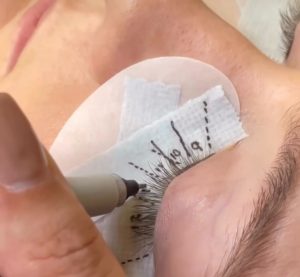

3. Fill in with smaller lines
4. Add extension lengths
Lengths, Shapes, and Thickness:
Another important aspect of mapping lash extensions is using the right size and type of lash for each natural lash. For example, using a longer or thicker extension on a shorter natural lash can create an unnatural look and cause discomfort for the client. Additionally, it’s important to ensure that the extensions are placed at the correct angle to mimic the natural growth pattern of the lashes.
It’s also essential to take your time during the mapping process. Rushing can lead to uneven or unnatural-looking extensions and can cause discomfort for the client. It’s better to take your time and ensure that each extension is placed correctly and in the right spot rather than trying to speed through the process.
Last Thoughts:
In conclusion, mapping lash extensions is an essential step in the eyelash extension application process that requires skill, patience, and attention to detail. Follow these tips in this blog post, and you can achieve a flawless, natural-looking set of extensions that your clients will love. Again, take your time, pay attention to detail, and have a proper consultation with your client.
XOXO, Bella Lash!